Introduction
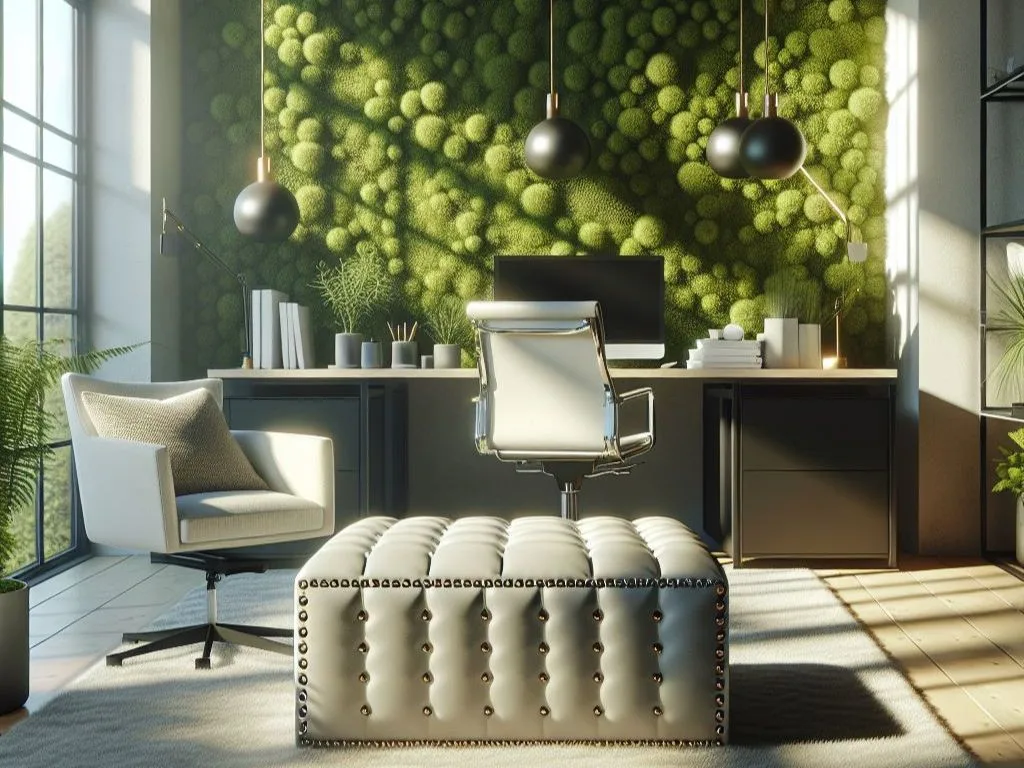
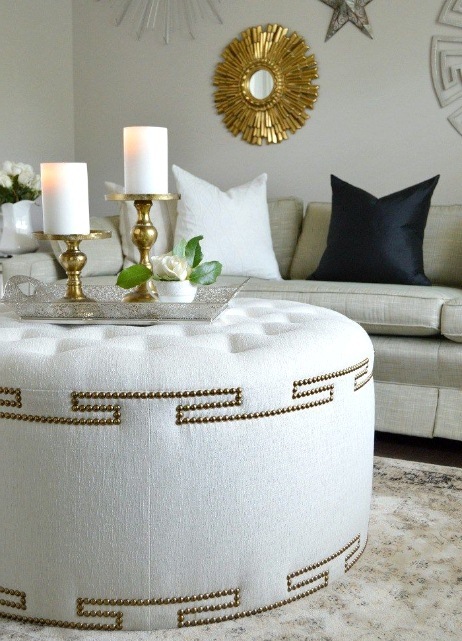
Furniture plays a crucial role in interior design, shaping the look and feel of a space. Among the various elements, ottomans stand out for their versatility and multi-functionality. Enhancing an ottoman with decorative nailhead designs adds sophistication and can bridge modern and industrial styles.
This post will explore the transformative impact of decorative nailheads on ottoman design, the financial benefits of customization, and the various techniques for incorporating these striking embellishments into your decor.
Discover how a simple ottoman can become a stunning focal point in your home.
Understanding Decorative Nails
Decorative nails, also known as upholstery nails or decorative tacks, are important in furniture design, especially for making items like ottomans. These nails serve a dual purpose: they are functional but also have a significant aesthetic role.
Unlike regular nails that mainly provide strength and support, decorative nails are used to enhance the beauty of furniture pieces. They are available in different shapes, sizes, and finishes, offering designers a wide range of creative options.
Types of Decorative Nails
One of the most appealing types of decorative nails is the shaped nail. These can feature various designs, including stars, flowers, and geometric patterns, each contributing a unique flair to the piece.
Curved tacks are another popular option; their rounded heads create a softer silhouette and can be particularly effective when used on upholstered surfaces.
Importantly, the choice between shaped nails and curved tacks can significantly influence the overall character of an ottoman or other upholstered furniture.
Installation Methods
The installation methods for decorative nails can vary slightly from standard nails. While standard nails are often driven directly into the wood, decorative nails typically require a more careful approach.
Using a Tack Hammer for Precision
Decorative nails are usually installed using a tack hammer, which allows for precision and minimizes the risk of damaging the upholstery.
Establishing an Effective Pattern
Establishing an effective pattern for nail placement is also crucial in achieving a harmonious look, as it can draw attention to specific design elements or create a cohesive outline for the furniture piece.
RELATED: Why People Like Round Ottoman Coffee Table
Materials Required
Creating an elegant ottoman with a decorative nailhead design requires specific materials and tools to ensure both functionality and aesthetic appeal.
Here’s a detailed list of what you’ll need for this project, along with their specifications to help you get ready.
1. Wooden Base
The core structure of the ottoman needs a sturdy wooden base. Here’s what you’ll need:
- A piece of plywood measuring ¾ inch thick, preferably 24 inches by 24 inches, will serve as the top surface.
- A 2×4 inch framing lumber should be cut into appropriate lengths for the support structure underneath.
2. Upholstery Fabric
The upholstery fabric is crucial for the overall look and comfort of the ottoman. Here’s what you should consider:
- Approximately two yards of high-quality fabric, such as upholstery-grade linen or velvet, is recommended.
- While choosing the fabric, think about colors and patterns that complement your existing decor.
3. Foam Padding
Foam padding, which can be found at a local craft store, is essential for providing cushioning. Here’s what you need:
- A thickness of 2-3 inches is suitable for a plush feel.
- A 24-inch by 24-inch piece should be enough for the top surface.
4. Decorative Nailheads
To achieve the decorative nailhead design, you’ll need to select decorative nailheads or tacks. Here’s what to keep in mind:
- Typically, a package of 50 to 100 nailheads in a color that coordinates with the upholstery will be sufficient.
- It is also wise to choose a nailhead spacing of about 1 inch apart for a uniform look.
5. Tools
In terms of tools, here’s what you’ll need:
- A staple gun with staples
- A hammer
- Scissors
- Measuring tape
- A straight edge
You might also need a drill and screws for securely attaching the framing.
Gathering all these materials and tools before starting the project will make your crafting experience smoother, leading to a more enjoyable and successful completion of your elegant ottoman.
Building the Ottoman Frame
Constructing a sturdy frame for your elegant ottoman is the first critical step in the creation process. Using high-quality materials, such as pine boards and plywood, guarantees durability and longevity.
Materials and Tools Needed
Before you start building, make sure you have the following materials and tools ready:
| Materials | Tools |
|---|---|
| Pine boards | Measuring tape |
| Plywood | Saw |
| Wood screws | |
| Drill | |
| Sandpaper |
Measuring and Cutting
- Accurately measure and cut the pine boards to form the base and sides of the ottoman.
- The frame structure typically consists of four vertical corner posts and horizontal pieces that join them at the top and bottom.
- The dimensions will depend on the desired size of the ottoman; however, a common approach is to create a rectangular base, ensuring that the width and length are proportional.
- When cutting the plywood for the top, allow for a slight overhang to create a more appealing aesthetic, which will ultimately enhance the overall decorative design.
Smoothing Edges
Once all pieces are cut, smooth the edges and surfaces with sandpaper to eliminate any splinters or rough patches. This step is especially important for the safety and comfort of the end-user.
Assembling the Frame
- Begin assembling the frame.
- Attach the horizontal pieces to the vertical posts using wood screws, ensuring that each connection is secure.
- It is advisable to pre-drill the holes for the screws to avoid splitting the wood.
- Aim for a right angle at each corner to ensure the ottoman sits evenly on the floor.
Checking Stability
Once the frame is assembled, check for stability by gently shaking the structure. If there is any wobbling, reinforce the connections with additional screws or corner brackets.
Importance of a Solid Base
The base should be solid, providing a reliable foundation for additional layers, such as padding and upholstery.
As intricate as it may appear, following these steps will lead to the successful construction of a customized ottoman frame, primed for further design embellishments.
Preparing for Upholstery
Preparing the ottoman for upholstery is a critical step that lays the foundation for a professional and polished final product.
Inspecting the Frame
The first step is to thoroughly inspect the wooden frame of the ottoman for any structural issues. If you find any worn or damaged components, it’s important to repair or replace them before proceeding with the upholstery process.
This ensures that the frame is strong and will support the upholstery materials applied later.
Applying Foam
- Once the frame is prepared, the next step is to apply foam to the seating surface. Typically, high-density foam is preferred due to its durability and ability to maintain its shape over time.
- To achieve a smooth finish, the foam should be cut precisely to fit the dimensions of the ottoman. It is advisable to use a serrated knife or an electric knife for clean cuts.
- After cutting, the foam can be secured to the frame using a spray adhesive, ensuring that it adheres effectively and uniformly. This helps to minimize any movement of the foam during the upholstery process.
Choosing and Cutting Fabric
- Next, you need to carefully choose the fabric for your ottoman, as it will significantly influence its visual appeal.
- Once you’ve selected the fabric, lay it out flat and cut it to size, allowing for extra material on the edges for wrapping around the frame.
Attaching Fabric
When attaching the fabric, it’s essential to start from the center and work outward. Pulling the fabric taut will help eliminate wrinkles or sagging.
At this stage, using staples is critical; a staple gun can be used to secure the fabric in place, penetrating deep enough to provide a firm hold without damaging the frame. This ensures a strong attachment and contributes to a clean, finished look.
Finishing Touches
As a final touch, trim any excess fabric neatly and check the edges for any loose threads or irregularities. Ensuring a tight, smooth finish not only enhances the aesthetic but also promotes longevity, making your ottoman a functional piece of furniture.
Applying the Faux Leather
Once you have prepared the ottoman structure and gathered your materials, it is time to apply the faux leather.
1. Prepare the Faux Leather Fabric
- Start by placing the faux leather fabric on a clean surface with the right side facing down.
- Measure how much you need to cover the ottoman, adding a few extra inches on each side to secure the fabric properly.
- This extra material is essential for a neat finish as it allows for tucking and folding.
2. Wrap the Ottoman
To begin wrapping, position the ottoman upside down. Center the faux leather fabric over the structure, ensuring that it drapes evenly on all sides.
- Start with one side by pulling the fabric taut and using a staple gun to attach it to the underside of the ottoman.
- It is crucial to secure the fabric every few inches to prevent any sagging or misalignment.
- Work your way around the ottoman, pulling the fabric tightly but not excessively, as this could distort the look of the final product.
3. Wrap the Corners
When wrapping the corners, make sure to fold the fabric neatly for a clean and professional look. Tuck any extra fabric underneath the base and secure it with staples. Here’s how to do it:
- Start by pulling the fabric from the top edge down to the side.
- Create a smooth finish by folding the fabric neatly.
- After finishing each corner, check that any visible edges are folded under and secured.
This technique not only enhances the appearance of the faux leather but also ensures its durability against wear over time.
4. Secure Side Panels
For the side panels, alternate folding the top and bottom edges of the fabric before securing them with staples. This technique creates a smooth transition between the visual elements of the ottoman while getting rid of any bulky look.
5. Finalize Your Project
Once all sides are securely fastened, trim any remaining excess fabric to finalize your project.
Adding Decorative Nailheads
When creating an elegant ottoman, the placement of decorative nailheads is crucial in achieving a refined appearance. These small yet impactful details greatly enhance the overall design and style of the piece.
Choosing the Right Nailheads
First things first, you need to pick the right kind of nailheads. This means considering their size and finish so that they match the fabric and structure of the ottoman.
Measuring and Marking
Once you’ve found the perfect nailheads, it’s time to measure and mark where they’ll go along the edges of the ottoman. Getting this measurement right is key to achieving a balanced appearance.
- A common method is to decide on a suitable distance between each nailhead, usually between 1 to 2 inches depending on your design choice.
- Use a measuring tape to carefully mark points around the perimeter of the ottoman where you’ll be installing the nails.
- If needed, use a straightedge to help you draw a straight line for uniformity and accuracy.
Installing with Care
After marking everything, it’s crucial to know how to properly install the nailheads. You want to make sure you don’t damage the upholstery underneath while hammering them in.
- Start by gently tapping each nailhead into its marked position using a hammer.
- Be careful not to hit too hard – just enough force to secure the nail without pushing it too deep, as that could ruin the fabric.
Final Touches
Once all the decorative nailheads are hammered in place, take a step back and look at it from different angles. This will help you check if everything is aligned correctly and if the design looks balanced.
Remember, paying attention to these small details will greatly enhance the overall craftsmanship of your ottoman, making it a truly special piece of furniture.
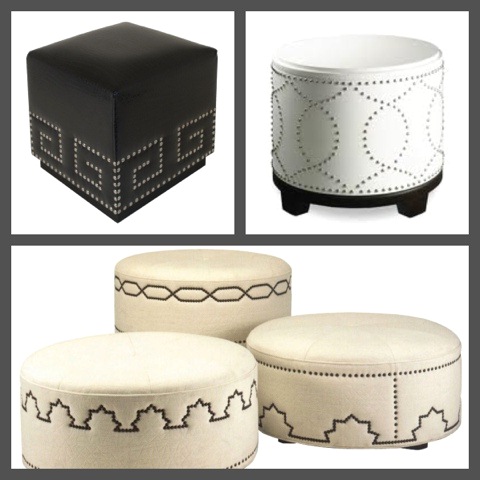
Design Tips and Customization Ideas
When making a decorative ottoman, your creativity is your greatest asset. There are many design possibilities, especially when it comes to using nailhead trim.
Nailheads not only make the ottoman look better but also allow you to personalize it in a way that reflects your unique style. Here are some ideas on how to use nailheads creatively:
Experiment with Different Nailhead Patterns
- Try out various arrangements of nailheads to create different effects.
- Use geometric shapes for a modern look or straight lines for a classic touch.
Incorporate Customized Motifs or Lettering
- Instead of sticking to traditional patterns, think about adding your own designs or initials.
- This will give the ottoman a personal touch and make it stand out even more.
Mix and Match Metallic Finishes
- Gold and silver are popular choices for nailheads, but don’t be afraid to get creative.
- Explore other metallic finishes such as copper or bronze that complement your existing decor.
Transform Your Ottoman into a Storage Chest
In addition to being stylish, ottomans can also serve a practical purpose. If you want to maximize utility without compromising on aesthetics, consider transforming your ottoman into a storage chest. Here’s how:
- Ensure that the construction includes a sturdy lid with strong hinges.
- Depending on what you plan to store inside, make sure there is enough internal compartmentalization.
- For added elegance, choose soft-close hinges that provide a smooth opening and closing motion.
Expanding Nailhead Applications to Other Furniture
The decorative nailhead design, traditionally reserved for ottomans, is now being used on various furniture pieces.
This technique not only enhances the appearance of individual items but also brings a sense of harmony to your home’s decor.
Couches
Nailheads can be used on couches to highlight the edges of the armrests or the back of the sofa, adding a touch of elegance and flair.
By combining fabric with metallic details, a plain sofa can be transformed into a bold centerpiece, enhancing the overall atmosphere of the room.
Headboards
- Another popular application of the decorative nailhead technique is on headboards.
- Upholstered headboards adorned with nailheads can add a luxurious touch to any bedroom.
- Placement can vary based on design preference, ranging from simple borders along the edges to intricate patterns that create focal points.
- This versatility in design allows homeowners to personalize their spaces further, making a dated bedroom feel modern and inviting.
Dining Chairs
Dining chairs with nailhead detailing can make your dining area more inviting. Whether you have a traditional or modern style, this decoration adds a touch of elegance, making the space more visually appealing and improving the overall dining experience.
Benches
Benches in entryways or hallways can also use the nailhead technique, providing both functional seating and an attractive greeting for guests.
Conclusion
Decorative nailheads offer a unique way to elevate the aesthetic of ottomans and other furniture pieces. Their versatility allows for creative expression, whether through different patterns, finishes, or applications on various items.
By choosing to personalize your furniture with decorative nails, you not only enhance its visual appeal but also create a functional piece that reflects your style.
Consider investing time in crafting your custom ottoman, as it can become a striking focal point in your home. Start your journey in furniture design today and transform your living space into something truly special.
FAQs
Decorative nailheads, also known as upholstery nails or decorative tacks, serve both functional and aesthetic purposes in furniture design. They enhance the beauty of items like ottomans, adding sophistication and character, while also providing structural support.
When selecting decorative nailheads, consider their size and finish to ensure they match the fabric and overall design of your ottoman.Choosing a color that coordinates with your upholstery will help create a cohesive look.
To craft your ottoman, you’ll need a sturdy wooden base (like plywood and framing lumber), upholstery fabric (such as linen or velvet), foam padding, decorative nailheads, and tools like a staple gun, hammer, scissors, and measuring tape.
Absolutely!You can experiment with different nailhead arrangements, such as geometric shapes or straight lines, and even incorporate customized motifs or initials to make your ottoman uniquely yours.
Consider mixing and matching metallic finishes, using varied patterns, or transforming your ottoman into a storage chest while maintaining elegance.You can also expand nailhead applications to other furniture pieces like couches and headboards for a cohesive look.
Start by measuring and marking where the nailheads will go, ensuring an even spacing of about 1 to 2 inches.Then, gently tap each nailhead into place using a hammer, being careful not to damage the upholstery beneath it.